Building a Microservices Web App with CI/CD, Docker & Kubernetes
E-Barter was my final-year project for my university course. The project brief assigned to me was to create a web app using the Microservices architecture that enabled users to be able to communicate and trade goods with each other as well as having separate access for an admin user to monitor the site.
Microservices are a collection of smaller, individual services that are linked together to create one unified service. Each service is containerized as an application in its own right, before they are orchestrated into a collection of containers that communicate with each other.
This approach to development results in greater stability as each service is independent from each other, so if one service goes down, the remaining services continue unaffected. However, this increased complexity does result in harder maintainability.
Setting Up the Project
To achieve the objectives outlined in the project brief, I decided to create 6 applications:
- Client: Handles front end and user interaction.
- Users: Manages user information and profiles.
- Items: Handles item listings by users.
- Auth: User Authentication and account creation.
- Trades Manage trades between users.
- Chats Provides chat functionality.
A directory for containing all Kubernetes deployment files was also necessary.
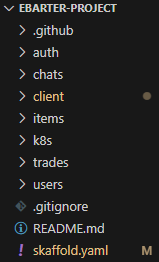
Creating the Microservices
Each microservice is a Node.js application and containerized with Docker. I opted to use Node.js as it is very commonly used in development with JavaScript. To handle the routing within each application, I used Express.js as I felt most confident in using it.
Containerizing with Docker
Docker is a platform for packaging applications or code into 'containers'. These containers are then able to be moved and deployed into other applications or areas which streamlines the production process. Docker containers can reliably run anywhere which makes them a popular choice for developing Microservices applications.
To containerize each individual project, a Dockerfile is required in the root directory of each project.
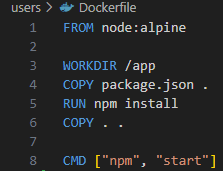
The Dockerfile specifies the instructions to build a Docker image. The image contains all the code, runtime, libraries and everything needed to run a piece of software (container).
The FROM command specifies the base image for the Docker image. node:alpine is a lightweight version of the Node.js Docker image which keeps the final image size smaller.
WORKDIR specifies the working directory inside the container to /app. The working directory is the root directory of the container and the following commands run relative to it.
The COPY command copies the package.json file from the local machine to the /app directory in the Docker image. The . at the end is used to represent the current directory in the container.
RUN runs the npm install command inside the Docker image which installs all dependencies listed in the package.json file.
COPY . . copies all files from the current directory to the /app directory in the Docker image.
Finally, the CMD command specifies the command to run when the container starts. npm start is the command typically used to start Node.js applications.
The image is then built with the command:
docker build -t app-name .
"Build" tells docker to build the image while -t determines the name. The '.' specifies the build command to fetch everything within the app.
Orchestrating Containers with Kubernetes
Kubernetes is a container orchestration platform that runs multiple containers as pods inside of a cluster. The cluster is essentially the collection of containers that run simulatenously to form the application in its entirity.
Setting up Kubernetes can be done easily using the built in Kubernetes engine inside Docker Desktop.
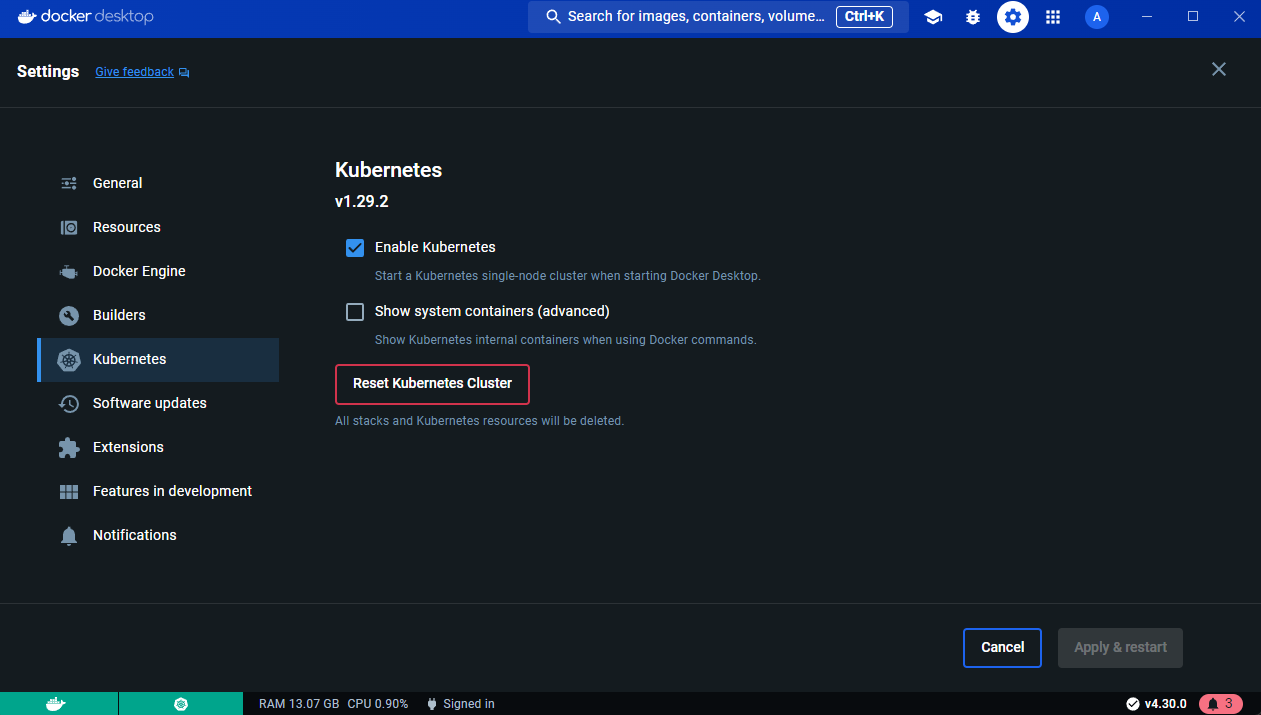
Click on the Settings cog on the navigation bar before entering the Kubernetes panel and ensure Enable Kubernetes is checked before applying & restarting if necessary.
For each application, a deployment file is needed to define the Kubernetes pod.
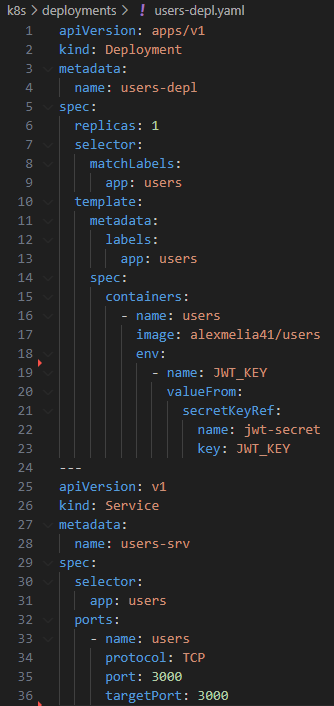
- apiVersion: apps/v1: Specifies the API version for the Deployment.
- kind: Deployment: Indicates that this is a Deployment object.
- metadata: Contains metadata for the Deployment, such as the name and labels.
- spec: Defines the desired state of the Deployment.
- replicas: 3: Specifies that three replicas of the pod should be running.
- selector: Defines how to identify the pods that belong to this Deployment.
- template: Specifies the template for the pods:
- metadata: Contains metadata for the pods, such as labels.
- spec: Defines the pod specification.
- containers: Lists the containers that should be running in the pod.
- name: The name of the container.
- image: The Docker image to use for the container.
- ports: The ports to expose.
- env: Environment variables for the container.
- volumeMounts: Volumes to mount inside the container.
In order to create each pod using the deployment file, use the command:
kubectl apply -f deployment.yaml
Implementing Nginx
Nginx is a web server with multiple use cases and is particularly useful in microservices apps. After establishing the pods within the cluster, a method of communication is needed for routing between the pods. This is achieved through a Load Balancer. A Load Balancer manages the incoming requests to the cluster and routes them required pod.
To implement the Load Balancer within a microservices app, an ingress service is needed. The ingress service defines the rules for the Load Balancer to follow when routing requests.
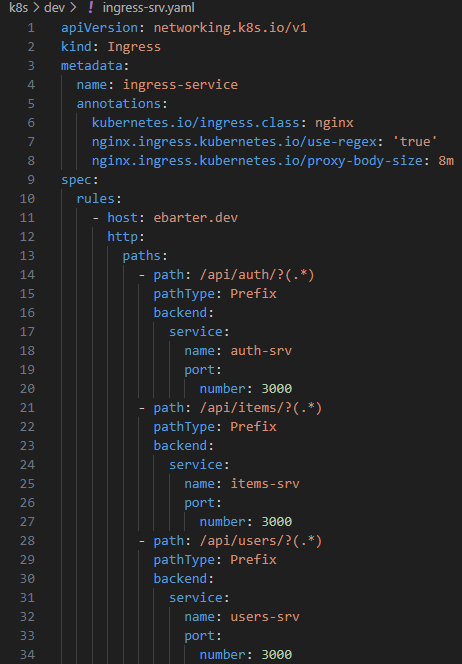
To get the Nginx Ingress Controller inside the cluster, use the command:
kubectl apply -f https://raw.githubusercontent.com/kubernetes/ingress-nginx/controller-v1.10.1/deploy/static/provider/cloud/deploy.yaml
CI/CD with Github Actions
CI/CD stands for Continuous Integration/Continuous Deployment. The purpose of CI/CD is to streamline the software development lifecycle by continuously integrating new code changes into a central repository storing production code.
I used Github Actions to achieve a pipeline that pushed code changes to the cluster hosted on AWS whenever changes were pulled into the main branch.
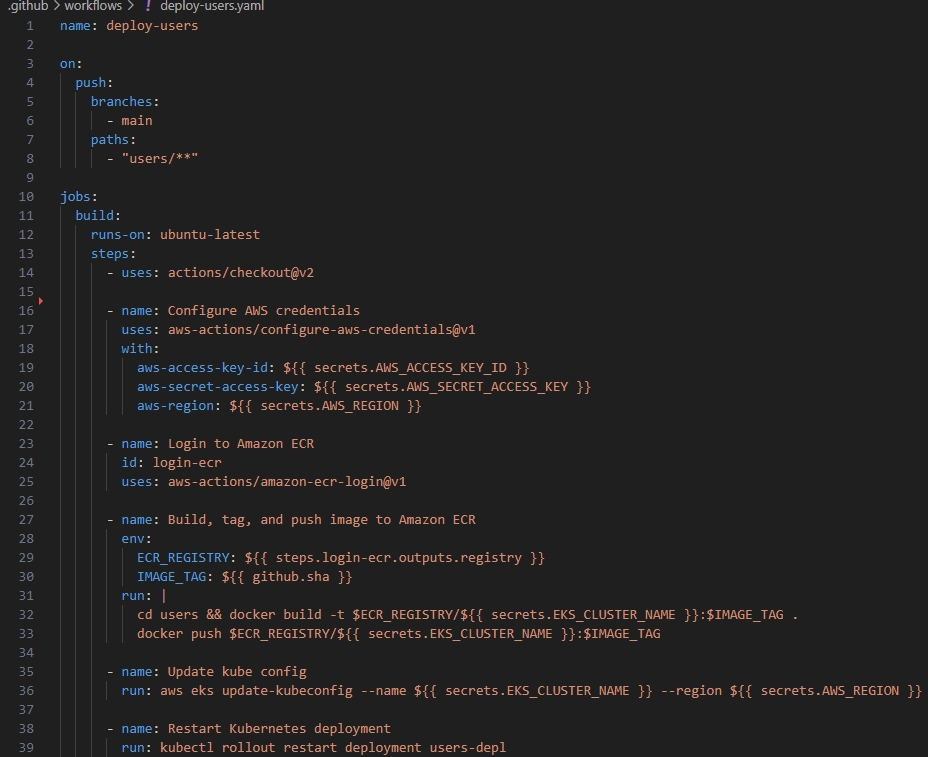
Trigger Event: The workflow is triggered by a push to the main branch. Paths: It specifically looks for changes in files located in the users/** directory. Jobs Job Name: build Runs On: ubuntu-latest Steps Checkout Repository:
Uses the actions/checkout@v2 action to check out the repository's code. Configure AWS Credentials:
Uses the aws-actions/configure-aws-credentials@v1 action to configure AWS credentials using secrets (AWS_ACCESS_KEY_ID, AWS_SECRET_ACCESS_KEY, AWS_REGION). Login to Amazon ECR:
Uses the aws-actions/amazon-ecr-login@v1 action to log in to Amazon Elastic Container Registry (ECR). Sets an output registry for the ECR registry URL. Build, Tag, and Push Docker Image:
Sets environment variables ECR_REGISTRY and IMAGE_TAG. Navigates to the users directory, builds a Docker image, tags it with the ECR registry and commit SHA, and pushes the image to ECR. Update Kubernetes Configuration:
Runs aws eks update-kubeconfig to update the kubeconfig file for the EKS cluster specified by the secret EKS_CLUSTER_NAME. Restart Kubernetes Deployment:
Uses kubectl rollout restart deployment users-depl to restart the users-depl deployment in Kubernetes, ensuring the new Docker image is deployed. Summary of Key Elements Trigger: Push to main branch with changes in users/** directory. Build and Push Docker Image: The workflow builds the Docker image for the users service, tags it, and pushes it to Amazon ECR. Update Kubernetes Deployment: It updates the Kubernetes configuration and restarts the deployment to apply the new image.
Managing Environments: Prod vs Dev
Having a working environment for both production and development is critical when developing apps.
A development environment enables you to fully test code changes and new features as they would appear in production - but without them being deployed. By doing so, any breaking changes that may occur can be rectified before being pushed to production before users have a chance of coming across them.
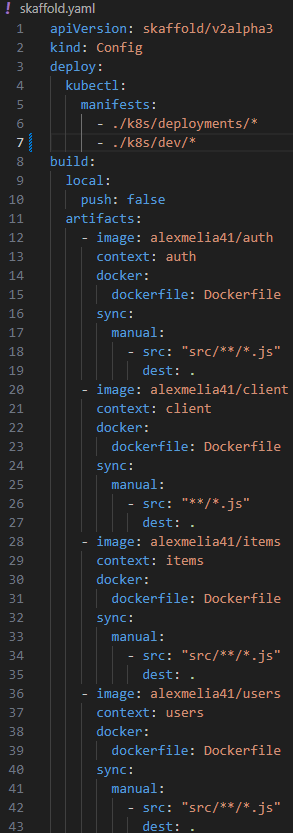
To create a development environment, I used Skaffold and Docker Desktop. Skaffold is a tool that enables continuous deployment of Kubernetes applications. The process of building and deploying to the cluster is automated, which provides a streamlined experience when developing.
Ensuring that Kubernetes is using the correct context for local development on Docker Desktop:
kubectl config use-context docker-desktop
I used Skaffold to define the images to be used in development or production.
Conclusion
Overall, I was happy with what I managed to achieve. All objectives outlined in the project brief were met and the site functions as intended and serves its purpose as a bartering platform.
I was particularly pleased with the robustness of the application. I developed an application that catered for multiple environments, had a CI/CD pipeline to automate the process of deployment and a solid Kubernetes cluster which had pods that were communicable.
Looking back, one aspect of the project that could be improved is the user interface. Having no experience in developing front-end interfaces at the time, I opted to use Material UI. Although the components were able to deliver a UI that was functional, it ultimately was not responsive which limits usability.
Also, to improve the platform, a localization feature could be enabled. This could be utilized to only display items that are within a reasonable distance to users or inform users of the items location so they can filter through them. Given that the platform has no way of facilitating the middleman role in a trade, the idea of trading items over a long distance, particularly a service, seems unreasonable.